Transferring MiniDV tapes to your computer is one of the best ways to preserve old camcorder videos before the tapes, camcorder, or playback equipment stop working. MiniDV tapes were popular in the late 1990s and early 2000s. Many families used them to record birthdays, vacations, school events, weddings, holidays, and everyday memories. The problem is that MiniDV tapes are now aging, and working MiniDV camcorders are becoming harder to find. If you still have MiniDV tapes, now is a good time to convert them to digital files so you can watch, save, back up, and share the videos more easily.
What You Need to Transfer MiniDV Tapes
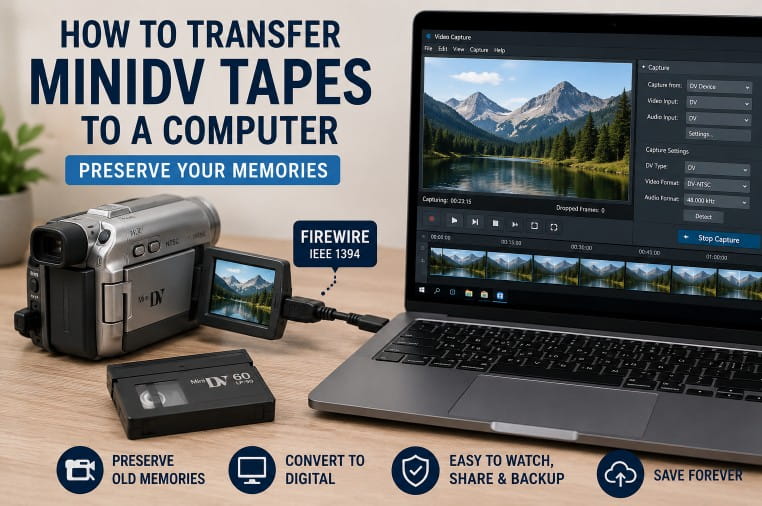
MiniDV tapes cannot usually be copied like regular files from a USB drive. You need equipment that can play the tape in real time and send the video signal to your computer. To transfer MiniDV tapes yourself, you usually need:- A working MiniDV camcorder or MiniDV tape deck.
- The original MiniDV tape.
- A computer with enough storage space.
- The correct cable connection, usually FireWire/IEEE 1394 for proper MiniDV capture.
- Video capture software.
- Time to monitor the transfer in real time.
Why FireWire Matters for MiniDV Transfer
For many MiniDV camcorders, the best way to transfer the tape to a computer is through FireWire, also known as IEEE 1394 or i.LINK on some Sony camcorders. FireWire allows the camcorder to send the DV video data to the computer for capture. This is different from simply plugging in a USB cable. On many MiniDV camcorders, USB was not intended for full-quality tape transfer and may only support photos, webcam features, or limited functions. This is one of the reasons MiniDV transfer can be difficult today. Many modern computers no longer include FireWire ports, and adapters do not always work depending on the computer, operating system, and camcorder.Can You Transfer MiniDV Tapes With USB?
Sometimes customers ask if they can transfer MiniDV tapes with a USB cable. In many cases, USB is not the proper connection for full MiniDV tape capture. Some camcorders have USB ports, but that does not always mean the USB port can transfer the tape footage properly. Many MiniDV cameras require FireWire for full tape transfer. If your camcorder manual specifically says USB video transfer is supported, then it may work. But for many MiniDV tapes, FireWire is the normal method for a proper computer capture.Step-by-Step: How to Transfer MiniDV to a Computer
If you have the right equipment, you can try transferring MiniDV tapes yourself. Here is the basic process:- Connect your MiniDV camcorder or tape deck to your computer using the correct cable.
- Turn the camcorder on and set it to playback, VCR, or VTR mode.
- Insert the MiniDV tape.
- Open your capture software on the computer.
- Select the camcorder or capture device as the input source.
- Press play on the camcorder and start capture in the software.
- Monitor the video and audio while the tape plays.
- Stop the capture when the tape finishes.
- Save and back up the finished digital file.
What Software Can Capture MiniDV?
The software depends on your computer and operating system. Some older programs that used to work well may no longer be supported on modern computers. Common options may include video editing or capture software that supports DV capture. The important thing is that the software must recognize the MiniDV camcorder or capture device and record the incoming video properly. If your computer does not recognize the camcorder, the issue may be the cable, FireWire card, operating system, driver, software, or camcorder itself.Common Problems When Transferring MiniDV Tapes
MiniDV transfer can be more technical than people expect. Even if the tape looks fine, problems can happen during capture. Common issues include:- The computer does not detect the camcorder.
- The camcorder no longer works.
- The FireWire port or cable does not work.
- The tape plays with glitches, blocks, or dropouts.
- The audio is missing or out of sync.
- The tape will not play, rewind, or fast-forward.
- The software crashes or stops capturing.
- The final file is too large or saved in the wrong format.
MiniDV Tapes Can Fail Over Time
MiniDV tapes are small, delicate magnetic tapes. Like VHS, VHS-C, Hi8, Digital8, 8mm, Betamax, and audio cassettes, they can deteriorate with age. MiniDV tapes may be affected by:- Humidity
- Mold
- Heat
- Cold storage
- Dust and dirt
- Tape wear
- Playback equipment problems
- Long-term storage in garages, attics, closets, or storage units
What File Format Should MiniDV Be Converted To?
For everyday use, MP4 is usually the most convenient final format. MP4 files are easy to watch, share, upload, store, and play on most computers, phones, tablets, smart TVs, and cloud services. Some people may want larger archival files, but for most families, MP4 is practical and easy to use. After your MiniDV tapes are transferred, you should back up the files in more than one place, such as a computer, USB drive, external hard drive, or cloud storage.Should You Transfer MiniDV Tapes Yourself?
You can transfer MiniDV tapes yourself if you have a working camcorder, the correct connection, capture software, and enough patience. DIY transfer may be a good option if:- You only have a few tapes.
- Your camcorder still works.
- Your computer can capture from the camcorder.
- You are comfortable troubleshooting cables and software.
- You have time to capture each tape in real time.